DIY - PeopleSoft On The Cloud - Part 1
-
Posted by Quest Editor
- Last updated 10/25/23
- Share
As part of our initiative to provide quality content to our community, Quest has teamed up with several PeopleSoft thought leaders who will be sharing their knowledge across our blogs. This week, Sasank Vemana, ERP Analyst begins a series of posts about his experience deploying a PeopleSoft Update Image on the Oracle Cloud.
Sasank Vemana, Quest Guest Blogger | Blog content sourced from Sasank’s PeopleSoft Log
There has been tremendous improvements in PeopleTools 8.55 – which we have seen over the past year – specifically involving changes that make deploying PeopleSoft on the Cloud a very real, intuitive and easy prospect.
Of course, deploying PeopleSoft on a hosted environment is not new and has been done in the past. But 8.55 makes it so much easier.
Most of us who work in the PeopleSoft space are already getting used to the various messaging from Oracle around Cloud and what it means to those using PeopleSoft applications. There are several great presentations (at conferences), webinars and documentation relevant to this subject which I guess is one of the hottest topics right now.
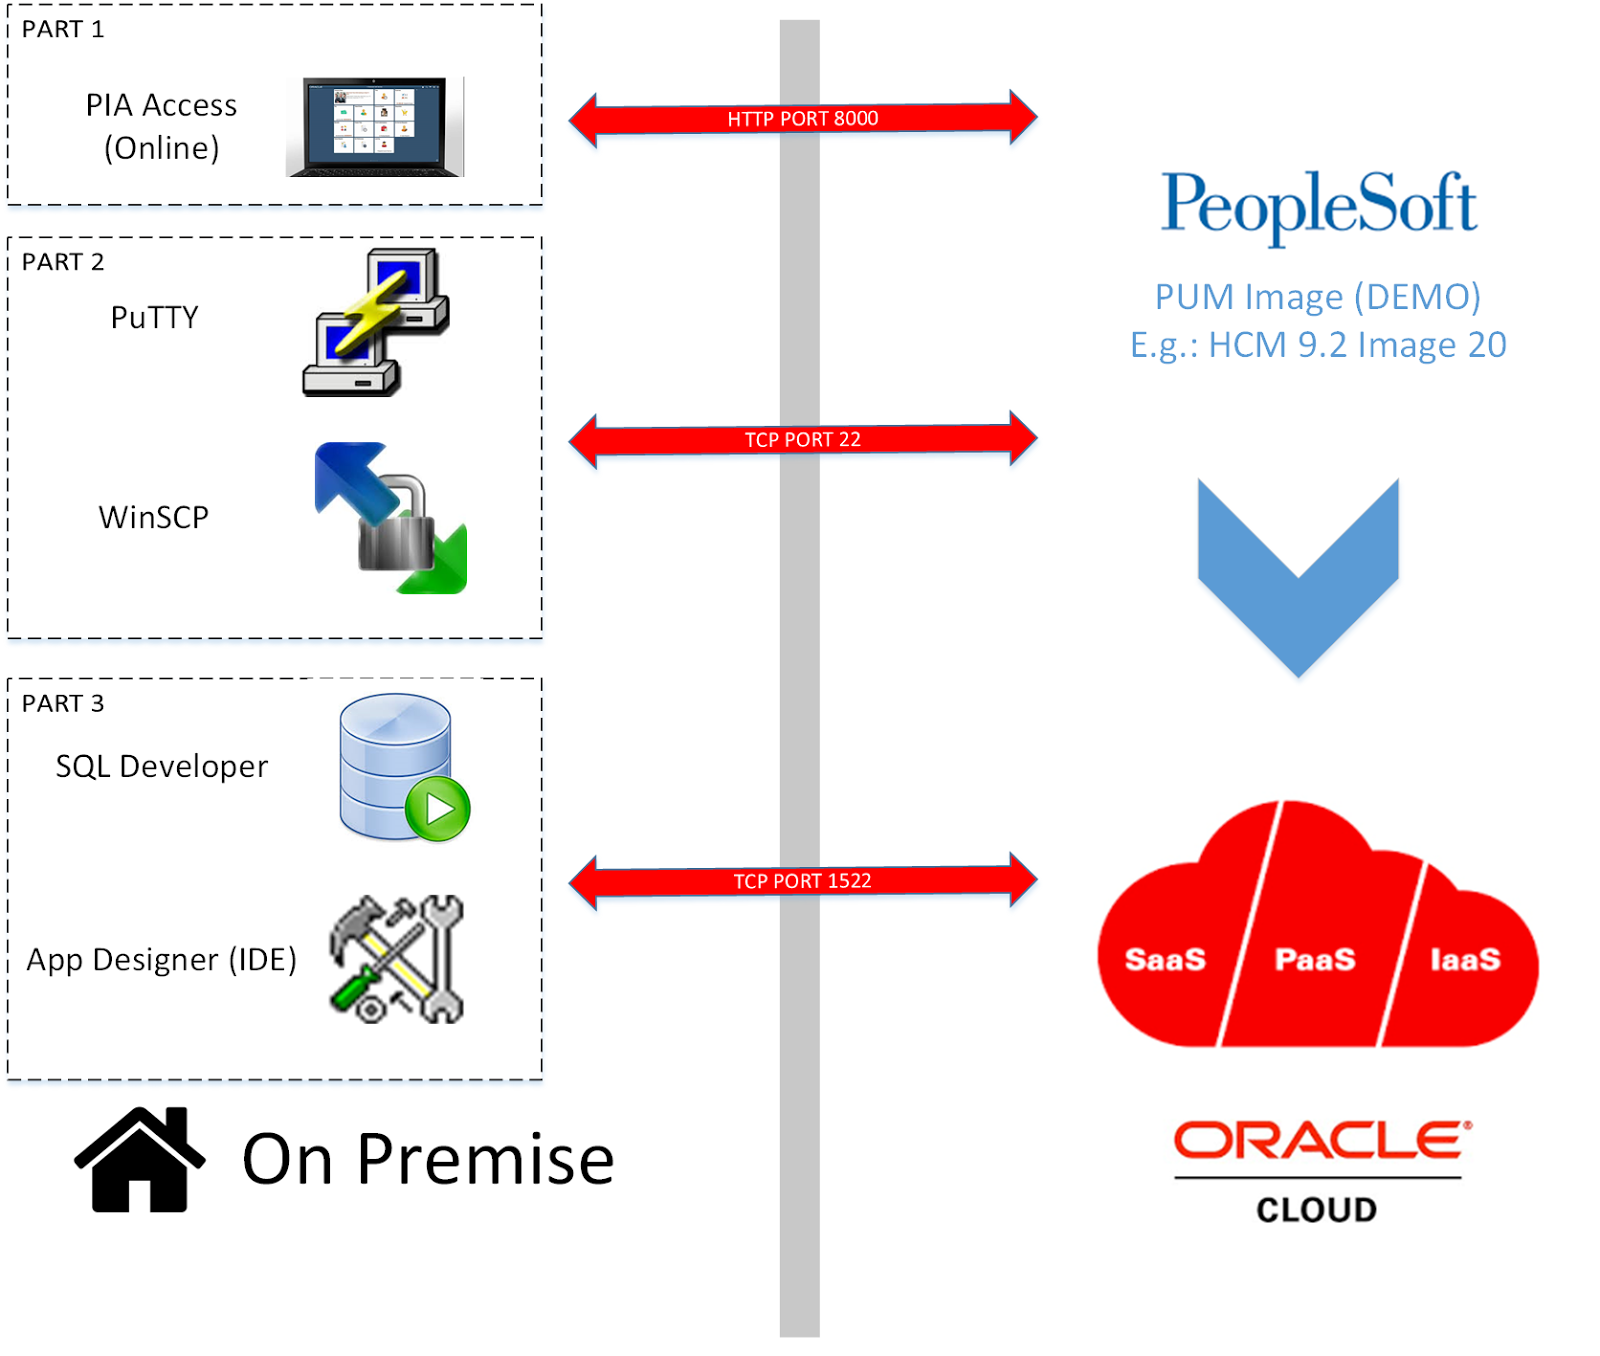
In this series of blog posts, I plan to take a very basic use case of deploying a PeopleSoft Update Image (DEMO) on the Oracle Compute Cloud and document the steps that I followed. I also intend to go beyond the immediate necessity of getting the environment up and running; and accessing the PIA for evaluating the latest features, enhancements and bug fixes. Additionally, this blog series will also cover how we can connect to the PUM Image – running on the Oracle Compute Cloud – using PuTTY, winSCP, SQL Developer, App Designer, etc. from an on-premise workstation to perform PeopleSoft administration and development related activities.
Note: At the time of writing, I am using a FREE TRIAL (30 day) access which is available for most Oracle Cloud services.
Part 1 (current post): Will cover what it takes to sign up (for the initial 30 day free trial), get started, up and running with a PeopleSoft Update Image (available on the Oracle Cloud Marketplace) deployed on the Oracle Compute Cloud.
Part 2: This post will cover how we can access the PUM Image deployed on the Oracle Compute Cloud (via SSH) using PuTTY and winSCP from an on-premise workstation to perform PSADMIN activities like administering and configuring the servers at various tiers.
Part 3: This post will cover how we can access the PUM Image deployed on the Oracle Compute Cloud using SQL Developer and App Designer from an on-premise workstation to perform PeopleSoft development related activities/research.
Before I proceed with Part 1, I would like to share a few resources that I highly recommend for those who are new to the concept of “PeopleSoft on the Cloud”.
Resources:
Quest Webinar: PeopleSoft on the Cloud – so, how do you use it?
Information Portal: PeopleSoft on Oracle Cloud
Oracle Red Paper: Getting Started with PeopleSoft Environments on the Oracle Compute Cloud Service
PeopleSoft Apps Strategy Blog: PeopleSoft on Oracle Cloud
I would also like to make a special mention to Logesh Balasubramaniam – from Presence of IT and author of “Lean IT Designs” blog – who was very helpful in sharing his knowledge and experiences on this topic.
The rest of this post will be heavily based on the following tutorial with some of my tips and experiences:
Deploying PeopleSoft Applications on Oracle Compute Cloud Service Instances
Step 1: Request a free trial access to the Oracle Compute Cloud
If you are – like me – new to hands on activity on the Oracle Cloud, you may perhaps be reminded of the following quote from The Rime of the Ancient Mariner by Samuel Taylor Coleridge.
“Water, water, every where,
Nor any drop to drink.”
To me, it was not very obvious which of the myriad Oracle Cloud Services I should be subscribing to and activating to deploy a PeopleSoft PUM Image from the Oracle Cloud Marketplace.
After working with the “Live Cloud Chat” team, I figured I needed the “Oracle Cloud PaaS and IaaS” Service.
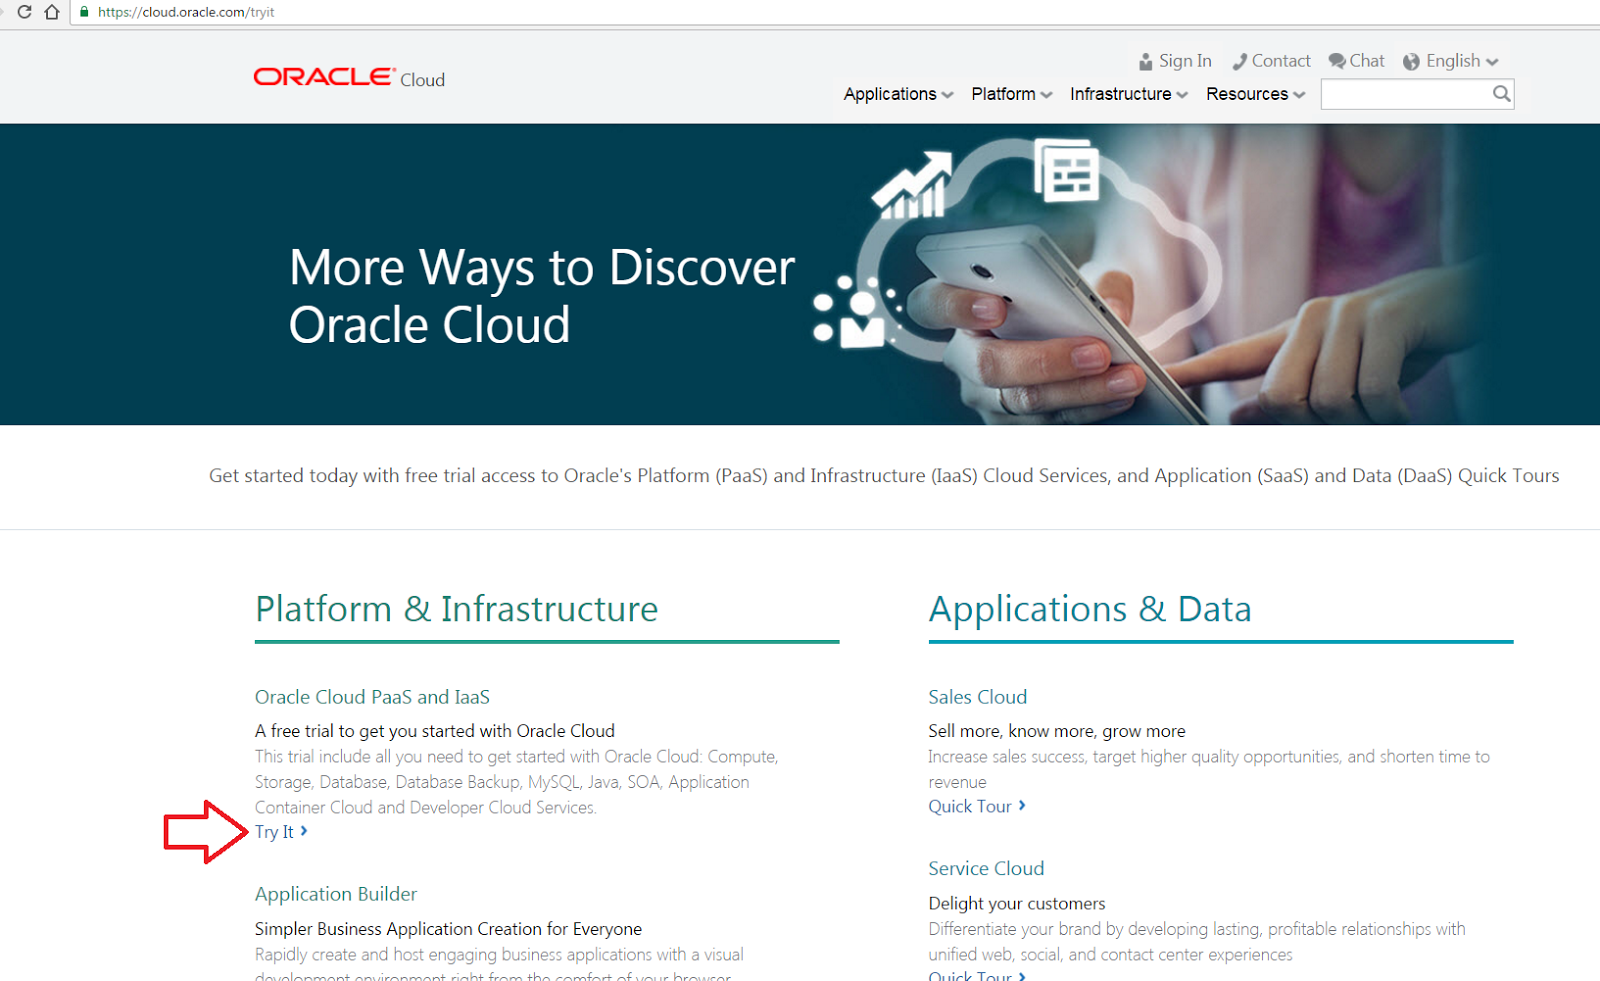
To get started, navigate to https://cloud.oracle.com/tryit and click on the “Try It” link under “Platform and Infrastructure”.
At this point, you will be prompted to signin with your Oracle account. Based on my personal experience and what I heard from the support team, the chances of getting the trial request processed in a timely fashion are much higher if you are using your enterprise id instead of a personal id.
Here is an excerpt from my conversation with the “Live Cloud Chat” team:
“Please note trials coming from personal email addresses (Yahoo/Gmail/Hotmail etc.) are not being processed at the moment, if you want to request for a trial of our cloud services please register using an official email ID (enterprise email: @yourcompany.com)”
Step 2: Wait until you receive an email from Oracle!
If you used an enterprise email address, you should get an email from Oracle (within an hour) which contains the access and subscription details.

Now we are ready to proceed further.
Step 3: Follow steps 1 through to 6 in tutorial
Now we are ready to go through the following steps in the tutorial:
Deploying PeopleSoft Applications on Oracle Compute Cloud Service Instances
- Generate an SSH key pair using an on-premises Linux or Microsoft Windows system.
- Upload the SSH public key to Oracle Compute Cloud Service.
- See: Tip 1 below
- Configure the Oracle Compute Cloud Service instance for HTTP access.
- Determine the PeopleSoft application to be deployed and initiate deployment in Oracle Cloud Marketplace.
- Use the Oracle Compute Cloud Service web console to configure the instance that will be used to host the PeopleSoft application.
- See: Tips 2 & 3 below
- Sign in to the PeopleSoft application.
Note: Please review Part 2 before proceeding with further steps in the tutorial (related to using SSH) because there are some security steps that are missing.
Once we complete the above mentioned steps (1-6) from the tutorial, we can login to the PIA of the PUM image running on the Oracle Compute Cloud. Since we opened the http port 8000 (or https depending on your choice), we can access the environment from anywhere via the internet!
Tip 1: Uploading the SSH public key
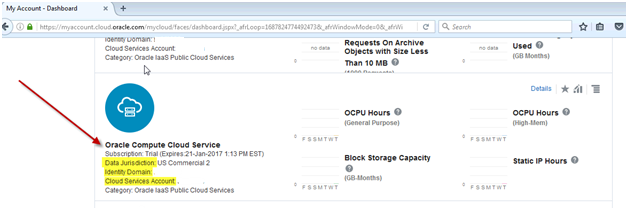
How do we determine our Cloud Data Center while signing into Oracle Cloud My Services application?

One way is to login to the “My Account Administration” received in the email (Step 2).
From Email:

Note the Oracle Compute Cloud Service Details from the Dashboard.
Tip 2: Configuring the instance
The screens for configuring the instance have changed in comparison to the tutorial but here are the main items to consider.
Image Settings:

Shape Settings:

Instance Settings:

Make sure you add the SSH Public Key (created in Step 1 of the tutorial):

Storage Settings:

Tip 3: Waiting for the instance to be “Running” after initiating the creation
After configuring, reviewing and creating the instance, I was not able to see the created instance (in “Preparing” status) in the Instance tab right away. Instead, I could only find 3 orchestrations with statuses as shown in the image below. This is normal!

I would encourage you to remain patient and wait for at least a couple of hours for the instance to show up in the Instance tab with a “Running” status as shown below before proceeding with subsequent steps.

To see more content from Sasank Vemana, check out Sasank’s PeopleSoft Log.