How to Create a Form Request in the Orchestrator Studio
-
Posted by Quest Editor
- Last updated 4/02/26
- Share
Verifying the Steps of Your Form Request
Before you create a form request, you should always verify the steps that you want the form request to perform. For this example, let’s review the steps in EnterpriseOne to place a credit hold on a customer:
- Sign into EnterpriseOne. The Tools page in the Orchestrator Studio provides a link to easily access the EnterpriseOne sign in screen.
- Access the Work with Addresses form (P01012) and locate a customer number.
- Once you’ve located a customer number, select the row.
- Click the row menu and select the A/R menu to access the Customer Master Revisions record for this customer.
- On this form, click the Credit tab.
- Enter a value of “7” in the Credit Message field.
- Click “OK” to save.
Creating a Form Request in Orchestrator Studio
Now that you’ve reviewed the steps in the process you want to replicate in your form request, you can return to Orchestrator Studio and configure a form request to perform those exact steps.
From the Orchestrator Studio homepage, access the Service Requests page.

From there, access the Design page to create a new form request by clicking the “Create Service Request” button and then selecting “Form Request.”
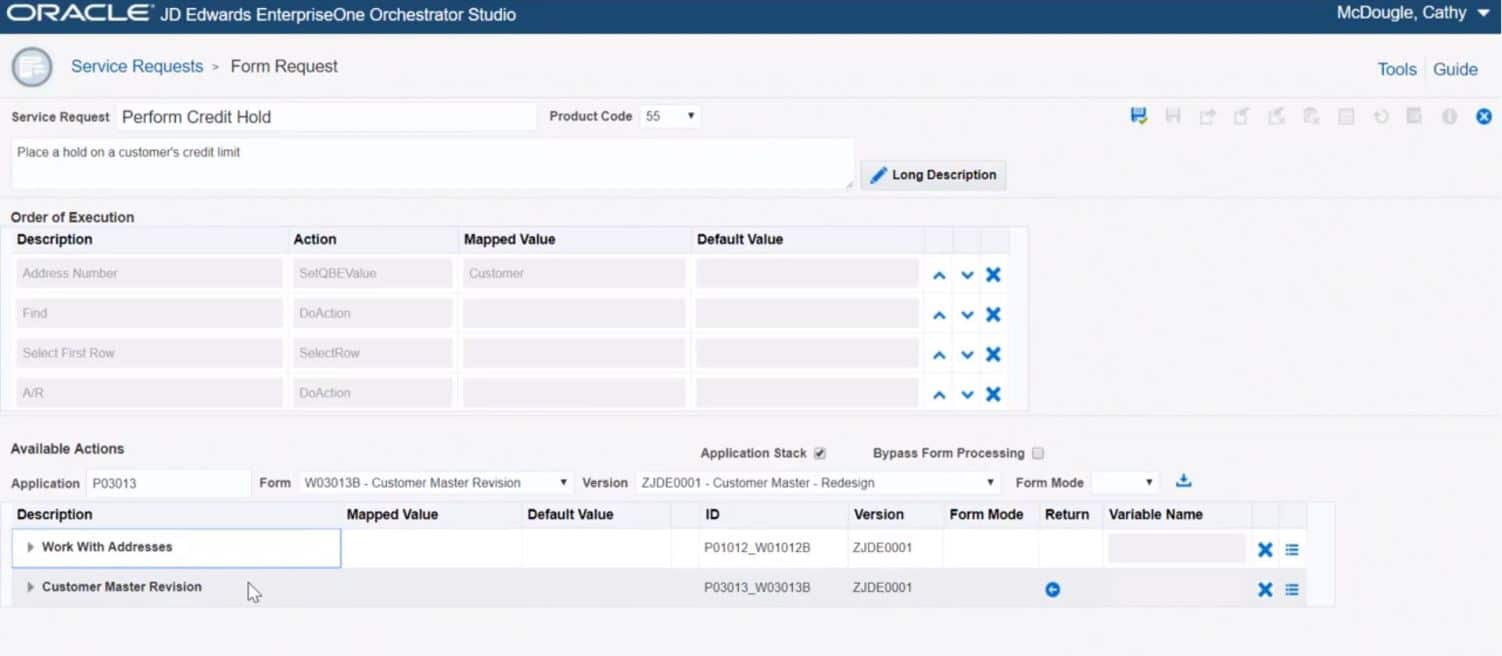
On the Form Request page, name your form request, give it a description, and select a product code to associate with it. In the Available Actions area, you will identify and configure the EnterpriseOne controls and fields to carry out a credit hold.

You then promote each field or control that you configure as an action to the Order of Execution area at the top. This is where you can verify that the actions are in the correct order or rearrange them if needed.

For the example in this video, the Application Stack option was selected because the form request needs to call more than one application to perform a credit hold. Without Application Stack processing, the form request would open a separate EnterpriseOne session for each application that is accessed by the form request.

Start identifying the actions by loading the first form that is used to perform a credit hold, which is the Work with Addresses form. Enter the application, form, and version ID of the Work with Addresses form to load the fields and controls for the form in the Available Actions grid. You’ll notice that the first row in the grid will contain a collapsible and expandable node for displaying the controls for the Work with Addresses form.
The columns in the grid provide fields and options to configure the controls. The next step in the form request is to locate the customer number that you want to place on credit hold. Under the Work with Addresses QBE node, locate the Address Number row that represents the Address Number QBE field. In the Map Value column, enter “Customer.” This will serve as a variable to pass in the address number of a customer to the form request. When adding this form request to an orchestration, you will define “Customer” as an input in the orchestration and map it to the “Customer” input in the form request. Then, add the action to the Order of Execution area. You can do this by clicking the “Add Action” icon at the end of the row.

You will then see that action in the Order of Execution area when you scroll back up to the top.
After passing in the customer number, we want the form request to click the “Find” button to locate the Customer Master Revisions record. Under the Buttons and Exits node, locate the Find row. Click the “Add Action” icon at the end of the row to move it to the Order of Execution area.
After performing a Find, the Work with Addresses form will display the Customer Master Revisions record in the first row of the grid. We want the form request to select this record. Under the Work with Addresses-Grid node, locate “Select First Row” and click the “Add Action” icon to move it to the Order of Execution area.
Finally, we want the form request to access the Accounts Receivable information for this customer. Under the Buttons and Exits node, find the A/R menu row and move it into the Order of Execution area.
After moving your final step into the Order of Execution area, review the Order of Execution to ensure that all steps are in the correct order. Rearrange your steps if necessary.
Next, you’ll need to specify the controls used in the Customer Master Revision form to carry out the credit hold. Enter the application, form, and version for the Customer Master Revision form. When you collapse the Work with Addresses node that you were previously working in, you’ll see a collapsible and expandable Customer Master Revision node underneath. Expand it to see the fields and controls.

On the Credit tab of the Customer Master Revision form, we want to place the value of “7” in the Credit Message field to place the customer’s credit on hold. Under the Customer Master Revision node, locate the row for the Credit Message field. In the Default Value column, enter the value “7.” Move the row to the Order of Execution by clicking the “Add Action” icon.
The final action required on this form is to click “OK” to save the updated customer record. In EnterpriseOne, this action automatically returns you to the Work with Addresses form. Locate the “OK” control under the Buttons and Exits node and add it to the Order of Execution.
After performing a credit hold, we want to configure the form request to return the customer name in case you decide to use the name later in a subsequent step of an orchestration. For example, you could configure an orchestration that used a message service request to send a message with the customer’s name and number to account representative after a credit hold is placed.
In the example in this video, there is one more action configured to return the customer name from the Work with Addresses form. Enter the application, form, and version for the Work with Addresses form again. You cannot reuse the first Work with Addresses node for this step because it occurs after the actions in the Customer Master Revision form. Expand the third row with the Work with Addresses node. Locate the Alpha Name row and click the checkbox in the Return column. In the adjacent Variable Name column, enter “Customer Name.” When you add this form request to an orchestration, the Customer Name variable will be automatically added as another orchestration input. This enables you to map the customer name returned from this form request to another step in the orchestration, such as a message service request.
To finish, save the form request. Back on the Service Request page, you can locate the form request that you just created. Click on the form request to view a graphical representation of each form that was configured in the form request.
For a step-by-step demonstration of how to create a form request in the Orchestrator Studio, check out the video below.
